How to add a logo to the Twenty Thirteen WordPress theme
(P) Codever is an open source bookmarks and snippets manager for developers & co. See our How To guides to help you get started. Public bookmarks repos on Github ⭐🙏
In this post I will share my experience of adding a logo in front of the site title when using the Twenty Thirteen theme for WordPress. I’ve been learning WordPress basics in the last couple of months, but I am no expert to create a custom theme, so I will stick to default ones for the moment. Up until today I have been using the Twenty Twelve theme – this is fully a responsive theme and with the right plugins you get a pretty good functionality, at least for a technical blog, …but I find it a little dull. So I said why not try some more colour? Well, the Twenty Thirteen theme is certainly an answer for that. I gave it a try on my localhost, I liked it, so I decided to give it a try in production. This is so cool about WordPress, you can change the look of your pages pretty fast, as long as you haven’t invested much too effort in customizing one theme. If by the time of your reading, Codepedia.org does not use the Twenty Thirteen anymore this is how it looked like :
Preview Twenty Thirteen Theme
Create a Child Theme
Well, because I need to modify something on a standard theme, it’s best practice to use a child theme. Otherwise if I made an update on theme, all my changes would be lost. A WordPress child theme is a theme that inherits the functionality of another theme, called the parent theme. Child theme allows you to modify, or add to the functionality of that parent theme. A child theme is the safest and easiest way to modify an existing theme, whether you want to make a few tiny changes or extensive changes. Instead of modifying the theme files directly, you can create a child theme and override within.
Note: Please follow Child Themes on WordPress to find out what’s the exact process to create a child theme.
To add the logo to the website I had to create the twentythirteen-child directory under WP_HOME/wp-content/themes, where I only store the header.php and style.css files.
header.php
If you want to modify anything to the site header, the first place you would want to look in the header.php file. After doing a HTML inspection I came to the conclusion that, indeed, this is the place where I have to add the logo image. For html and css inspection I use Firebug :
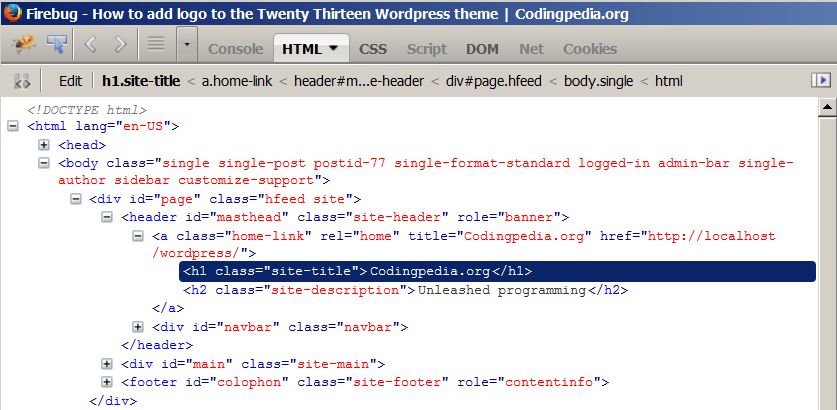
Firebug HTML inspector
Before:
..........
<header id="masthead" class="site-header" role="banner">
	<a class="home-link" href="<?php echo esc_url( home_url( '/' ) ); ?>" title="<?php echo esc_attr( get_bloginfo( 'name', 'display' ) ); ?>" rel="home">
		<h1 class="site-title"><?php bloginfo( 'name' ); ?></h1>
		<h2 class="site-description"><?php bloginfo( 'description' ); ?></h2>
	</a>

	<div id="navbar" class="navbar">
		<nav id="site-navigation" class="navigation main-navigation" role="navigation">
			<h3 class="menu-toggle"><?php _e( 'Menu', 'twentythirteen' ); ?></h3>
			<a class="screen-reader-text skip-link" href="#content" title="<?php esc_attr_e( 'Skip to content', 'twentythirteen' ); ?>"><?php _e( 'Skip to content', 'twentythirteen' ); ?></a>
			<?php wp_nav_menu( array( 'theme_location' => 'primary', 'menu_class' => 'nav-menu' ) ); ?>
			<?php get_search_form(); ?>
		</nav><!-- #site-navigation -->
	</div><!-- #navbar -->
</header><!-- #masthead -->
..........
After:
..........
<header id="masthead" class="site-header" role="banner">
	<a class="home-link" href="<?php echo esc_url( home_url( '/' ) ); ?>" title="<?php echo esc_attr( get_bloginfo( 'name', 'display' ) ); ?>" rel="home">
		<div id="logo_and_title">
				<img class="header-logo" src="https://www.codepedia.org/wp-content/uploads/2013/11/logo.png"/>
				<div id="title_subtitle">
					<h1 class="site-title"><?php bloginfo( 'name' ); ?></h1>
					<h2 class="site-description"><?php bloginfo( 'description' ); ?></h2>
				</div>
				<div class="clear"></div>
		</div>
	</a>
	<div id="navbar" class="navbar">
		<nav id="site-navigation" class="navigation main-navigation" role="navigation">
			<h3 class="menu-toggle"><?php _e( 'Menu', 'twentythirteen' ); ?></h3>
			<a class="screen-reader-text skip-link" href="#content" title="<?php esc_attr_e( 'Skip to content', 'twentythirteen' ); ?>"><?php _e( 'Skip to content', 'twentythirteen' ); ?></a>
			<?php wp_nav_menu( array( 'theme_location' => 'primary', 'menu_class' => 'nav-menu' ) ); ?>
			<?php get_search_form(); ?>
		</nav><!-- #site-navigation -->
	</div><!-- #navbar -->
</header><!-- #masthead -->
..........
Note that the only difference to the original file is adding the image (line 5) and some extra div elements to get better control with the style sheet file.
style.css
Talking about style sheet files, create one – style.css – in the child theme directory (twentythirteen-child) :
/*
 Theme Name:     Twenty Thirteen Child
 Theme URI:      https://example.com/twenty-thirteen-child/
 Description:    Twenty Thirteen Child Theme
 Author:         John Doe
 Author URI:     https://example.com
 Template:       twentythirteen
 Version:        1.0.0
*/

@import url("../twentythirteen/style.css");

.entry-content code, .comment-content code {
    font-family: Consolas,Monaco,Lucida Console,monospace;
    font-size: 0.857143rem;
    line-height: 2;
    background-color:#E8E8E8;
    padding: 0px 3px;
}
#social_logos {margin-top:-15px;}
.social_logo { float: left; margin-right: 15px; height: 34px; width: 34px;}
.clear {clear:both;margin:0;padding:0;}
#author_portrait {box-shadow:0 0 0 rgba(0, 0, 0, 0.2);}
.amazon_book {float:left; padding:0 10px;}

.header-logo {float:left; margin-top:50px;}
#title_subtitle {float:left;}
.clear {clear:both;margin:0;padding:0;}
.entry-thumbnail img {
    border-radius: 3px;
    box-shadow: 0 1px 4px rgba(0, 0, 0, 0.2)
}
.entry-title {font-size:34px;}
h2 {font-size:25px;margin:20px 0}
p {margin:0 0 17px}
.sidebar .entry-header, .sidebar .entry-content, .sidebar .entry-summary, .sidebar .entry-meta {
    max-width: 1140px;
    padding: 0 376px 0 60px;
}
@media (max-width: 720px) {
.header-logo {height:90px; width:90px;}
.site-title {font-size:30px;}
}
@media (max-width: 420px) {
.header-logo {display:none}
}
Note that the style sheet must start with the comment lines (1-9). You can change each of these lines to suit your theme. The only required lines are the Theme Name (line 2), and the Template (line 7). The Template is the directory name of the parent theme. In this case, the parent theme is the TwentyThirteen theme, so the Template is twentythirteen, which is the name of the directory where the TwentyThirteen theme resides. If you want to make a child of a theme with the directory name example-theme-name, then you would use Template: example-theme-name.
Note : the child theme’s stylesheet is included after the parent theme’s and styles will therefore override those in the parent theme’s stylesheet (line 11).
Now to the logo adding part, I floated both the image (line 27) and the title_subtitle div (line 28) to the left, and after that I cleared the floating (line 29).
To keep the responsivness of the theme I used media queries (lines 41-47). This makes the image and texts smaller when the size shrinks (I based the sizing on the original style.css file, where max-width is a little bit smaller, but unless I set it bigger, it would have moved the title under the logo for some widths). You can see this in action by resizing the browser window of this post.
Well, that’s it. Easy, wasn’t it? I have to thank the WordPress guys for that and for creating this amazing product – keep up the good work guys!!!
If you liked this, please show your support by following us and joining us on Podcastpedia.org. We promise to only share high quality podcasts and episodes.
Resources