How to configure Nginx in production to serve an Angular app and reverse proxy NodeJS
(P) Codever is an open source bookmarks and snippets manager for developers & co. See our How To guides to help you get started. Public bookmarks repos on Github ⭐🙏
In this guide we are going to:
- install the latest NGINX version in Ubuntu 16.04.1
- understand configuration files
- generate SSL certificates and configure them in NGINX
- configure NGINX as reverse proxy
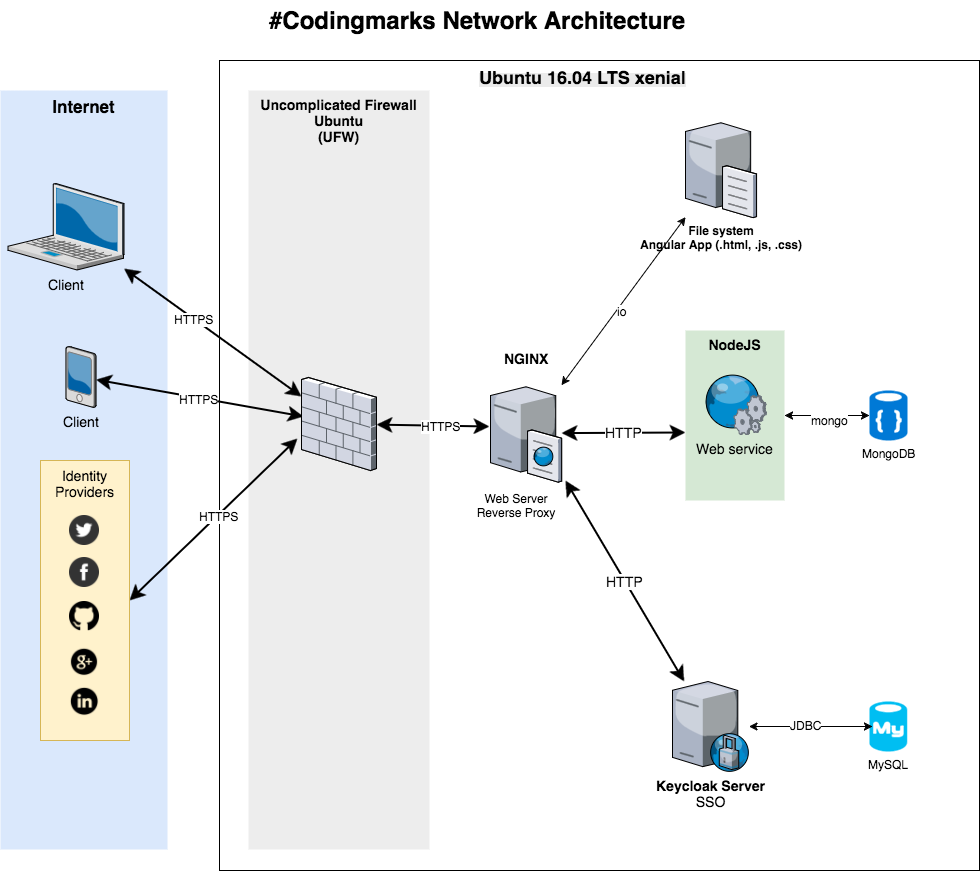
NGINX is a free, open-source, high-performance HTTP server and reverse proxy, as well as an IMAP/POP3 proxy server. We use it in the #DevBookmarks project as web server to serve static files and as a reverse proxy for the NodeJS API and Keycloak Server:
- Install Nginx latest version
- Manage the Nginx Process
- Nginx Config Files and Directories
- Nginx setup for www.codever.dev
- Nginx Pittfals
- Conclusion
- References
The server we are setting up Nginx for, is an Ubuntu 16.04.1 LTS:
$ lsb_release -a
No LSB modules are available.
Distributor ID:	Ubuntu
Description:	Ubuntu 16.04.1 LTS
Release:	16.04
Codename:	xenial
Nginx is available in Ubuntu’s default repositories. But the version available there is a little bit out-dated - when I initially installed via
$ sudo apt-get update;
$ sudo apt-get install nginx
I got the version 1.10.0. Please see here the Nginx changelog.
Install Nginx latest version
To install the latest version, (at the time of this writing [2017.05.15] is 1.12.0),
we will add the official Nginx repositories. At the end of the /etc/apt/sources.list file,
we append the following stanza(=config snippet):
deb https://nginx.org/packages/ubuntu/ xenial nginx
deb-src https://nginx.org/packages/ubuntu/ xenial nginx
Note
- xenial is the Ubuntu release we are using (see command above). For a mapping of Ubuntu versions to release names, please visit the Official Ubuntu Releases page.
- if there is concern about persistence of repository additions (i.e. DigitalOcean Droplets), the appropriate stanza may instead be added to a different list file under /etc/apt/sources.list.d/, such as /etc/apt/sources.list.d/nginx.list.
Ok, now we can install nginx by issuing again the following commands:
$ sudo apt-get update
$ sudo apt-get install nginx
You will probably be prompted for your user’s password. Enter it to confirm that you wish to complete the installation. The appropriate software will be downloaded to your server and then automatically installed.
Verify Web Server
At the end of the installation process, Ubuntu 16.04 starts Nginx. The web server should already be up and running. We can check with the systemd init system to make sure the service is running by typing:
$ systemctl status nginx
The output should be similar to the following:
● nginx.service - LSB: Stop/start nginx
   Loaded: loaded (/etc/init.d/nginx; bad; vendor preset: enabled)
   Active: active (running) since Mon 2017-05-15 09:21:58 CEST; 20min ago
     Docs: man:systemd-sysv-generator(8)
  Process: 3133 ExecStart=/etc/init.d/nginx start (code=exited, status=0/SUCCESS)
 Main PID: 24279 (code=exited, status=0/SUCCESS)
   CGroup: /system.slice/nginx.service
           ├─3141 nginx: master process /usr/sbin/nginx -c /etc/nginx/nginx.con
           └─3142 nginx: worker process
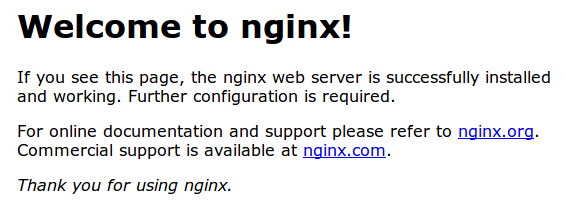
Now we go in the browser type in our server’s our public IP address.
We should see the default Nginx landing page, which should look something like this:
Manage the Nginx Process
Now that we have our web server up and running, we can go over some basic management commands.
To stop the web server, we can type:
$ sudo systemctl stop nginx
To start the web server when it is stopped, type:
$ sudo systemctl start nginx
To stop and then restart the service again, type:
$ sudo systemctl restart nginx
By default, Nginx is configured to start automatically when the server boots. If this is not what you want, you can disable this behavior by typing:
$ sudo systemctl disable nginx
To re-enable the service to start up at boot, you can type:
$ sudo systemctl enable nginx
Nginx Config Files and Directories
Backup
Before modifying any of the configuration files, I strongly recommend that you backup them. I use aliases to make my life easier. For example, to backup the configuration for www.bookmarks.dev I defined the following in ~/.bash_aliases:
alias nginx-backup-config-bookmarks.conf=nginxconfigbackup

nginxconfigbackup(){
  sudo cp /etc/nginx/sites-available/www.codever.dev /etc/nginx/sites-available/www.codever.dev.$(date "+%Y-%m-%d_%H:%M")-$1 #the parameter ending is the comment use dashes "-" between words
}
Now, let’s say I want to do a backup before configuring SSL. I would run then:
$ nginx-backup-config-bookmarks.conf before-ssl
The result is a backup file named www.bookmarks.dev.2017-05-20_09:30-before-ssl, that contains the name of the original file + timestamp when the backup was done + the text I input before as parameter.
Check out my post - A developer’s guide to using aliases, to learn more about my philosophy of using aliases.
Content
- /var/www/html: the actual web content, which by default only consists of the default Nginx page you saw earlier, is served out of the /var/www/html directory. I deploy alose here the generated front end part with Angular CLI. I do this for the default’s sake and due to the fact there is only one website site being served by NGINX.
Server Configuration
- /etc/nginx: the nginx configuration directory; all of the Nginx configuration files reside here
- /etc/nginx/nginx.conf: the main Nginx configuration file; this can be modified to make changes to the Nginx global configuration. (the location depends on the package system used to install NGINX and the operation system. It is typically one of /usr/local/nginx/conf, /etc/nginx, or /usr/local/etc/nginx)
- /etc/nginx/sites-available: the directory where per-site “server blocks” can be stored;
Nginx will not use the configuration files found in this directory unless they are linked to the
sites-enabled directory (see below).Typically, all server block configuration is done in this directory, and then enabled by linking to the other directory. - /etc/nginx/sites-enabled/: the directory where enabled per-site “server blocks” are stored.
Typically, these are created by linking to configuration files found in the
sites-availabledirectory. - /etc/nginx/snippets: this directory contains configuration fragments that can be included elsewhere in the Nginx configuration. Potentially repeatable configuration segments are good candidates for refactoring into snippets.
Server Logs
- /var/log/nginx/access.log: every request to your web server is recorded in this log file unless Nginx is configured to do otherwise.
- /var/log/nginx/error.log: any Nginx errors will be recorded in this log.
Before reading any further, my advice is to read also the Understanding the Nginx Configuration File Structure and Configuration Contexts
Nginx setup for www.codever.dev
Now that we have a gross understanding of what where belong let’s configure NGINX for our production project - #DevBookmarks.
nginx.conf
Remember to back it up, before anything…
Here is the final /etc/nginx/nginx.conf file:
user www-data;
worker_processes auto;
pid /run/nginx.pid;

events {
        worker_connections 768;
        # multi_accept on;
}

http {

        ##
        # Basic Settings
        ##

        sendfile on;
        tcp_nopush on;
        tcp_nodelay on;
        keepalive_timeout 65;
        types_hash_max_size 2048;
        # server_tokens off;

        # server_names_hash_bucket_size 64;
        # server_name_in_redirect off;

        include /etc/nginx/mime.types;
        default_type application/octet-stream;

        ##
        # Logging Settings
        ##

        access_log /var/log/nginx/access.log;
        error_log /var/log/nginx/error.log;

        ##
        # Gzip Settings
        ##

        gzip on;
        gzip_disable "msie6";

        # gzip_vary on;
        # gzip_proxied any;
        # gzip_comp_level 6;
        # gzip_buffers 16 8k;
        # gzip_http_version 1.1;
        gzip_types text/plain text/css application/json application/javascript text/xml application/xml application/xml+rss text/javascript;

        ##
        # Virtual Host Configs
        ##

        include /etc/nginx/conf.d/*.conf;
        include /etc/nginx/sites-enabled/*;
}
Let’s go through the sections, one by one.
Global context
We will begin with the core directives:
user www-data;
worker_processes auto;
pid /run/nginx.pid;

events {
        worker_connections 768;
        # multi_accept on;
}
- user - defines which Linux system user will own and run the nginx server. Most Debian-based distributions use
www-databut this may be different in other distros. - worker_process - defines how many threads, or simultaneous instances, of nginx to run. You can learn more about this directive and the values of adjusting it here.
- pid - defines a file that will store the process ID of the main process.
- worker_connections - sets the maximum number of simultaneous connections that can be opened by a worker process.
HTTP (universal configuration)
The next section of the nginx.conf file covers the HTTP directives, which will hold the majority of the configuration, when we configure NGINX as a web server and reverse proxy, as it is our case.
Note:
- the
includestatement at the beginning of this section includes the filemime.typeslocated at /etc/nginx/mime.types; this means that anything written in the mime.types file is interpreted as if it was written in thehttp{}block; this approach allows us to include a lengthy amount of information in thehttp { }` block without having it clutter up the main configuration file. Try to avoid too many chained inclusions (i.e., including a file that itself includes a file, etc.). Keep it to one or two levels of inclusion if possible, for readability purposes. - we can always include all files in a certain directory with the directive:
include /etc/nginx/sites-enabled/*; - or we can include all .conf files in a directory, as above
include /etc/nginx/conf.d/*.conf; - the
gzipdirective tells the server to use on-the-fly gzip compression to limit the amount of bandwidth used and speed up some transfers. For full definitions of the gzip options, check out the http gzip module from the nginx docs. For example thegzip_comp_levelsets the gzip compression level of a response, trades CPU for bandwidth (values from 1 to 9, defaults to 1)
For detailed explanations of every directive in the HTTP block, check out the http core module from the nginx documentation.
And we are done with global configuration, let’s see now:
Server (Virtual Domains Configuration)
The HTTP block of the nginx.conf file contains the statement include /etc/nginx/sites-enabled/*;. This allows for server block configurations to be loaded in from separate files found in the sites-enabled sub-directory. Usually these are symlinks to files stored in /etc/nginx/sites-available/. By using symlinks we can quickly enable or disable a virtual server while preserving its configuration file. Nginx provides a single default virtual host file, which we will use as a template to create virtual host files for other domains:
$ sudo cp /etc/nginx/sites-available/default /etc/nginx/sites-available/www.codever.dev
In the end we need to activate the host by creating a symbolic link between the sites-available directory and the sites-enabled directory:
$ sudo ln -s /etc/nginx/sites-available/www.codever.dev /etc/nginx/sites-enabled/www.codever.dev
To both avoid the “conflicting server name error” and ensure that going to your site displays the correct information, we disable the “default” server block by removing the symbolic link to it:
$ sudo rm /etc/nginx/sites-enabled/default
Now let’s do our own thing and start with:
Configure Browser Caching
The ngx_http_headers_module module allows adding the “Expires” and “Cache-Control” header fields.
If these headers are set, they can tell the browser that the requested file can be kept locally for a certain amount of time (including forever) without requesting it again.
If the headers are not set, browsers will always request the file from the server, expecting either 200 OK or 304 Not Modified responses.
To achieve this, we add two new sections:
- the first one before the
serverblock, where we define how long to cache different file types - the second one, inside the
serverblock where we set the caching header
Combined we get:
. . .
# Expires map
map $sent_http_content_type $expires {
    default                    off;
    text/html                  epoch; #means no cache, as it is not a static page
    text/css                   max;
    application/javascript     max;
    application/woff2          max;
    ~image/                    30d; #it is only the logo, so maybe I could change it once a month now
}

server {
    . . .

    expires $expires;
. . .
We’re using several different settings in this map:
- the
defaultvalue is set tooff, which will not add any caching control headers. It’s a safe bet for content we have no particular requirements on how the cache should work. - for
text/html, we set the value toepoch. This is a special value which results explicitly in no caching, which forces the browser to always ask if the website itself is up to date. - for
text/css,application/javascriptandapplication/woff2which are stylesheets, Javascript and font files, we set the value tomax. This means the browser will cache these files for as long as it can, reducing the amount of requests considerably given that there are typically many of these files. When we build and deploy new versions, Angular CLI takes care we get new hash numbers css, js and font files (e.g. styles.81d3fa268855c0b8089d.bundle.css, main.43ad6a3e3c64f7186a0d.bundle.js, fontawesome-webfont.af7ae505a9eed503f8b8.woff2) - the last setting is for
~image/, which is a regular expression that will match all file types containingimage/in their MIME type name (likeimage/jpgandimage/png). It is set for 30 days.
Inside the server block, the expires directive (a part of the nginx headers module) sets the caching control headers.
It uses the value from the $expires variable set in the map. This way, the resulting headers will be different depending on the file type.
If we inspect the Network in Chrome or Firefox dev-tools, we can see the ‘Expires’ and ‘Cache-Control’ headers set. For js, css and font files:
Expires: Thu, 31 Dec 2037 23:55:55 GMT
Cache-Control: max-age=315360000
And for the html file:
Cache-Control: no-cache
Expires: Thu, 01 Jan 1970 00:00:01 GMT
Nginx Security
Security is configured also in our virtual host configuration
We use Let’s Encrypt and Certbot to obtain and manage the SSL/TLS Certificates.
Install Certbot
On Ubuntu systems, the Certbot team maintains a PPA.
Once you add it to your list of repositories all you’ll need to do is apt-get the following packages:
$ sudo apt-get install software-properties-common
$ sudo add-apt-repository ppa:certbot/certbot
$ sudo apt-get update
$ sudo apt-get install certbot
Obtain SSL certificate
Certbot supports a number of different “plugins” that can be used to obtain and/or install certificates.
Since our server architecture doesn’t yet officially support automatic installation we should probably use the certonly command to obtain our certificate - certbot certonly
This allows us to interactively select the plugin and options used to obtain our certificate. We will be using the webroot plugin.
The Webroot plugin works by placing a special file in the /.well-known directory within our document root, which can be opened (through your web server) by the Let’s Encrypt service for validation. Add the following location block in our virtual host config:
location ~ /.well-known {
        allow all;
}
To obtain a cert using the “webroot” plugin, which can work with the webroot directory of any webserver software:
$ sudo certbot certonly --webroot --webroot-path=/var/www/html -d bookmarks.dev -d www.codever.dev
If this is the first time running certbot, we will be prompted to enter an email address and agree to the terms of service.
After doing so, we should see a message telling the process was successful and where your certificates are stored:
Output
IMPORTANT NOTES:
- Congratulations! Your certificate and chain have been saved at
  /etc/letsencrypt/live/bookmarks.dev/fullchain.pem. Your cert
  will expire on 2017-07-19. To obtain a new or tweaked version of
  this certificate in the future, simply run certbot again. To
  non-interactively renew *all* of your certificates, run "certbot
  renew"
- If you lose your account credentials, you can recover through
  e-mails sent to ama@example.com.
- Your account credentials have been saved in your Certbot
  configuration directory at /etc/letsencrypt. You should make a
  secure backup of this folder now. This configuration directory will
  also contain certificates and private keys obtained by Certbot so
  making regular backups of this folder is ideal.
- If you like Certbot, please consider supporting our work by:

  Donating to ISRG / Let's Encrypt:   https://letsencrypt.org/donate
  Donating to EFF:                    https://eff.org/donate-le
Plese note the path and expiration date of your certificate, highlighted in the example above.
Certificate Files
After obtaining the cert, we will have the following PEM-encoded files:
- cert.pem: the domain’s certificate
- chain.pem: the Let’s Encrypt chain certificate
- fullchain.pem: cert.pem and chain.pem combined
- privkey.pem: the certificate’s private key
It’s important that we are aware of the location of the certificate files that were just created, so we can use them in our web server configuration. The files themselves are placed in a subdirectory in /etc/letsencrypt/archive. However, Certbot creates symbolic links to the most recent certificate files in the /etc/letsencrypt/live/bookmarks.dev directory. Because the links will always point to the most recent certificate files, this is the path that we should use to refer to your certificate files.
We can check that the files exist by running this command:
$ sudo ls -l /etc/letsencrypt/live/bookmarks.dev
The output should be the four previously mentioned certificate files:
$ sudo ls -l /etc/letsencrypt/live/bookmarks.dev
[sudo] password for ama:
total 0
lrwxrwxrwx 1 root root 49 Apr 17 22:18 cert.pem -> ../../archive/bookmarks.dev/cert2.pem
lrwxrwxrwx 1 root root 50 Apr 17 22:18 chain.pem -> ../../archive/bookmarks.dev/chain2.pem
lrwxrwxrwx 1 root root 54 Apr 17 22:18 fullchain.pem -> ../../archive/bookmarks.dev/fullchain2.pem
lrwxrwxrwx 1 root root 52 Apr 17 22:18 privkey.pem -> ../../archive/bookmarks.dev/privkey2.pem
Note the suffix 2 in this case - it is because the certificates have been renewed once
In a moment, we will configure our web server to use fullchain.pem as the certificate file, and privkey.pem as the certificate key file.
Generate Strong Diffie-Hellman Group**
To further increase security, we should also generate a strong Diffie-Hellman group. To generate a 2048-bit group, use this command:
$ sudo openssl dhparam -out /etc/ssl/certs/dhparam.pem 2048
This may take a few minutes but when it’s done we will have a strong DH group at /etc/ssl/certs/dhparam.pem.
Configure TLS/SSL on Nginx
Now that we have an SSL certificate, we need to configure our Nginx web server to use it.
We will make a few adjustments to our configuration:
- we will create a configuration snippet containing our SSL key and certificate file locations.
- we will create a configuration snippet containing strong SSL settings that can be used with any certificates in the future.
- we will adjust the Nginx server blocks to handle SSL requests and use the two snippets above.
This method of configuring Nginx will allow us to keep clean server blocks and put common configuration segments into reusable modules.
Create a Configuration Snippet Pointing to the SSL Key and Certificate
First, let’s create a new Nginx configuration snippet in the /etc/nginx/snippets directory.
To properly distinguish the purpose of this file, we will name it ssl- followed by our domain name, followed by .conf` on the end:
$ sudo vim /etc/nginx/snippets/ssl-bookmarks.dev.conf
Within this file, we just need to set the ssl_certificate directive to our certificate file and the ssl_certificate_key to the associated key:
ssl_certificate /etc/letsencrypt/live/bookmarks.dev/fullchain.pem;
ssl_certificate_key /etc/letsencrypt/live/bookmarks.dev/privkey.pem;
Save and close the file.
Create a Configuration Snippet with Strong Encryption Settings
Next, we will create another snippet that will define some SSL settings. This will set Nginx up with a strong SSL cipher suite and enable some advanced features that will help keep our server secure.
The parameters we will set can be reused in future Nginx configurations, so we will give the file a generic name:
$ sudo vim /etc/nginx/snippets/ssl-params.conf
To set up Nginx SSL securely, we will be using the recommendations by Remy van Elst on the Cipherli.st site. This site is designed to provide easy-to-consume encryption settings for popular software. You can read more about his decisions regarding the Nginx choices at Strong SSL Security on nginx.
The default suggested settings on Cipherli.st offer strong security. Sometimes, this comes at the cost of greater client compatibility. If you need to support older clients, there is an alternative list that can be accessed by clicking the link on the link labeled “Yes, give me a ciphersuite that works with legacy / old software.”
The compatibility list can be used instead of the default suggestions in the configuration below. The choice of which config you use will depend largely on what you need to support.
Here is the file content :
# from https://cipherli.st/
# and https://raymii.org/s/tutorials/Strong_SSL_Security_On_nginx.html

ssl_protocols TLSv1 TLSv1.1 TLSv1.2;
ssl_prefer_server_ciphers on;
ssl_ciphers "EECDH+AESGCM:EDH+AESGCM:AES256+EECDH:AES256+EDH";
ssl_ecdh_curve secp384r1;
ssl_session_cache shared:SSL:10m;
ssl_session_tickets off;
ssl_stapling on;
ssl_stapling_verify on;
resolver 8.8.8.8 8.8.4.4 valid=300s;
resolver_timeout 5s;
# Disable preloading HSTS for now.  You can use the commented out header line that includes
# the "preload" directive if you understand the implications.
#add_header Strict-Transport-Security "max-age=63072000; includeSubdomains; preload";
add_header Strict-Transport-Security "max-age=63072000; includeSubdomains";
#add_header X-Frame-Options DENY;#needs to be deactivated because of keycloak
add_header X-Content-Type-Options nosniff;

ssl_dhparam /etc/ssl/certs/dhparam.pem;
Save and close.
Adjust Nginx to Use SSL
$ sudo vim /etc/nginx/sites-available/bookmarks.dev
We splitt the configuration in two separate blocks. In the first block after the two first listen directives,
we will add a server_name directive, set to the server’s domain name. We will then set up a redirect to the second server block we will be creating.
server {
    listen 80 default_server;
    listen [::]:80 default_server;
    server_name www.codever.dev;

    return 301 https://$server_name$request_uri;
}
The second server block contains the remaining configuration:
server {

    # SSL configuration
    #

    #listen 443 ssl http2 default_server;
    listen 443 ssl default_server;
    #listen [::]:443 ssl http2 default_server; # does not work properly with Angular, TODO research about this
    listen [::]:443 ssl default_server;

    expires $expires;

    include snippets/ssl-bookmarks.dev.conf;
    include snippets/ssl-params.conf;
    ....
}
Save and close the file when finished.
Adjust the Firewall
We have ufw firewall enabled, so we need to adjust it to allow SSL trafic. Nginx registers a few profiles with ufw upon installation.
We can see the current status by typing:
$ sudo ufw status
To let in HTTPS traffic, we can allow the “Nginx Full” profile and then delete the redundant “Nginx HTTP” profile allowance:
$ sudo ufw allow 'Nginx Full'
$ sudo ufw delete allow 'Nginx HTTP'
Enable changes in Nginx
First, we should check that there are no syntax errors in our files. We can do this with the following command:
$ sudo nginx -t
If everything is ok, we should see a result similar to the following:
nginx: the configuration file /etc/nginx/nginx.conf syntax is ok
nginx: configuration file /etc/nginx/nginx.conf test is successful
We can now safely restart nginx - $ sudo systemctl restart nginx
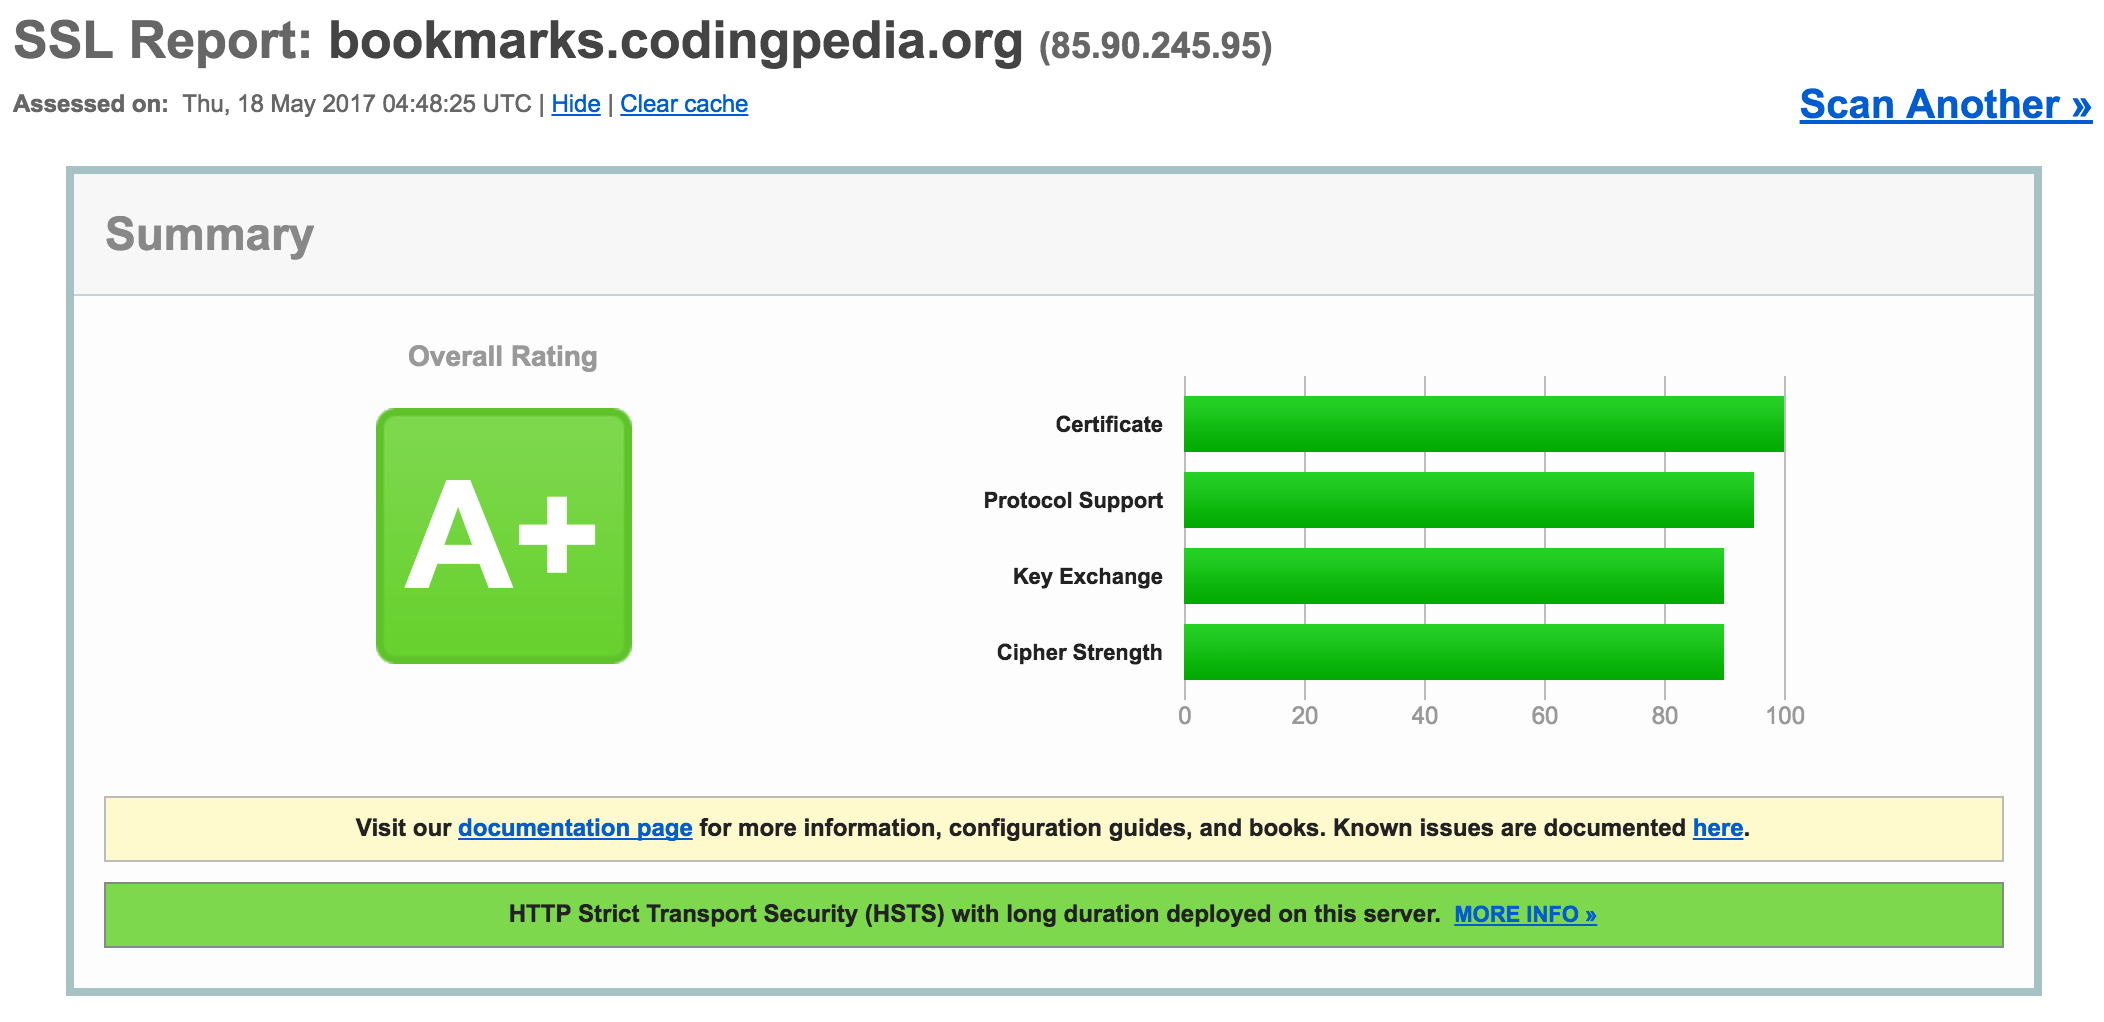
To test out our SSL certificate we should go now to Qualys SSL Labs and type in our domain. We should congratulate ourselves now for getting a A+ rating:
Use Nginx as Reverse proxy
We use Nginx also as reverse proxy for our Keycloak Server and our NodeJS backend server.
Nginx configuration to reverse proxy Keycloak
In our setup we have Nginx as reverse proxy in front of our Keycloak authentication server. The frontend proxy sits on the “public” network and forwards requests to the backend Keycloak Server that is not accessible from exterior .
We could extend this setup basis to use Nginx also as a load balancer, that would load balance requests between several Keyloak instances, if we choose the clustered operating mode… Not the case yet
In our server configuration file, _ /etc/nginx/sites-available/bookmarks.dev_, we first define an upstream keycloak server:
upstream keycloak_server {
   server localhost:8180;
}
Our Keycloak server runs on port 8180, which is protected from exterior via firewall rules
(see sudo ufw status).
Now, a few features in Keycloak rely on the fact that the remote address of the HTTP client connecting to the authentication server is the real IP address of the client machine. Examples include:
- Event logs - a failed login attempt would be logged with the wrong source IP address
- SSL required - if the SSL required is set to external (the default) it should require SSL for all external requests
- Authentication flows - a custom authentication flow that uses the IP address to for example show OTP only for external requests
- Dynamic Client Registration
We need to do some extra configuration so that the actual client IP address is forwarded to and processed by the Keycloak server instance. Specifically:
- Configure our reverse proxy to properly set
X-Forwarded-ForandXForwarded-ProtoHTTP headers. - Configure our reverse proxy to preserve the original ‘Host’ HTTP header.
- Configure the authentication server to read the client’s IP address from
X-Forwarded-Forheader .
The Nginx configuration to enable this, part of the second server block:
server {
  ...
  location /auth/ {
          proxy_pass https://keycloak_server;

          proxy_http_version 1.1;

          proxy_set_header Host               $host;
          proxy_set_header X-Real-IP          $remote_addr;
          proxy_set_header X-Forwarded-For    $proxy_add_x_forwarded_for;
          proxy_set_header X-Forwarded-Proto  $scheme;
  }
  ...
}
Note :
- by setting the location block to
/auth/, we make sure that every request forhttps://www.codever.dev/auth/*is redirected to the Keycloak server proxy_passis the directive that passes the HTTP request to the proxiedkeycloak_server, we defined in the upstream beforeproxy_http_versionsets the HTTP protocol verion for proxying
Nginx configuration to reverse proxy NodeJS
The setup and thoughts are similar to proxying Keycloak. We define first a NodeJS upstream server:
upstream node_server {
   server localhost:3000;
}
It makes sense also to forward to NodeJS the original host, IP address. So we use basically
the same configuration, only the location is set differently to api:
server {
  ...
  location /api/ {
          proxy_pass https://node_server/api/;

          proxy_http_version 1.1;

          proxy_set_header Host               $host;
          proxy_set_header X-Real-IP          $remote_addr;
          proxy_set_header X-Forwarded-For    $proxy_add_x_forwarded_for;
          proxy_set_header X-Forwarded-Proto  $scheme;
  }
  ...
}
In the current configuration the backend api is reachable via
https://www.codever.dev/api/*, which forwards the requests to the backend node api athttp://localhost:3000/api/*
Configure Nginx aliases
Throughout this guide, you’ve seen lots of Nginx commands one needs to use. To make our life easier I defined a bunch of aliases. Here is the snippet from ~/.bash_aliases with the NGINX aliases:
# Nginx
alias nginx-start="sudo systemctl start nginx"
alias nginx-stop="sudo systemctl stop nginx"
alias nginx-restart="sudo systemctl restart nginx"
alias nginx-status="systemctl status nginx"
alias nginx-reload="sudo kill -HUP `cat /var/run/nginx.pid`"
alias nginx-vim-default="sudo vim /etc/nginx/sites-available/default"
alias nginx-vim-bookmarks.conf='sudo vim /etc/nginx/sites-available/bookmarks.dev'
alias nginx-vim-nginx.conf="sudo vim /etc/nginx/nginx.conf"
alias nginx-tail-error.log="sudo tail -f -n200 /var/log/nginx/error.log"
alias nginx-tail-access.log="sudo tail -f -n200 /var/log/nginx/access.log"
alias nginx-cd-nginx.conf="cd /etc/nginx/"
alias nginx-verify-config="sudo nginx -t"
alias nginx-backup-config-bookmarks.conf=nginxconfigbackup

nginxconfigbackup(){
  sudo cp /etc/nginx/sites-available/bookmarks.dev /etc/nginx/sites-available/bookmarks.dev.$(date "+%Y-%m-%d_%H:%M")-$1 #the parameter ending is the comment use dashes "-" between words
}
Nginx Pittfals
Now that we are ready with the configuration, we should have a look at Nginx Pittfals, not to have done something really BAD…
Conclusion
I have to admit it is a lengthy guide, but we’ve learned quite a few things, like installing Nginx, generate SSL certificates with Let’s Encrypt and configure them in Nginx, configure Nginx as a reverse proxy for our IAM and backend APIs servers.
I am a developer by heart and by job, with some sysadmin experience, so if you notice I did something terribly wrong, please leave a comment in the comments section… Very much appreciated.
This blog post is a clone of the wiki page Setup Nginx in production
References
- https://nginx.org/en/docs/
- https://www.nginx.com/resources/admin-guide/configuration-files/
- https://nginx.org/en/docs/ngx_core_module.html
- https://nginx.org/en/docs/http/ngx_http_core_module.html
- https://www.digitalocean.com/community/tutorials/how-to-install-nginx-on-ubuntu-16-04
- https://www.digitalocean.com/community/tutorials/how-to-secure-nginx-with-let-s-encrypt-on-ubuntu-16-04
- https://www.linode.com/docs/web-servers/nginx/how-to-configure-nginx
- https://www.digitalocean.com/community/tutorials/how-to-set-up-nginx-virtual-hosts-server-blocks-on-ubuntu-12-04-lts–3
- https://www.digitalocean.com/community/tutorials/how-to-implement-browser-caching-with-nginx-s-header-module-on-centos-7
- https://certbot.eff.org/all-instructions/#ubuntu-16-04-xenial-nginx
- https://raymii.org/s/tutorials/Strong_SSL_Security_On_nginx.html
- https://cipherli.st/
- https://www.nginx.com/resources/admin-guide/reverse-proxy/