Introduction to AngularJs Form Validation
(P) Codever is an open source bookmarks and snippets manager for developers & co. See our How To guides to help you get started. Public bookmarks repos on Github ⭐🙏
AngularJs is often seen as a viable solution for building full scale single page web applications. In this post we will go over how Angular is particularly well suited for building form-intensive large scale apps due it’s numerous form validation features (example).
Angular was initially a tool for making forms simpler
Before it became an open source framework, Angular was meant as a development tool targeted mostly at web designers. The framework would allow designers to enhance plain HTML pages and give them the ability to validate and persist forms in a transparent way (see referencehere).
The initial idea was to allow designers to use some extra HTML tags or attributes for adding dynamic capabilities to a web page, without having to write almost any Javascript at all.
Using Angular for form validation
At 44k minified and compressed, Angular packs a lot of interesting functionality for doing dynamic form validation.
Take for example the following form for user creation, it does the following (interactive example bellow):
- highlights fields in error dynamically as we type
- provide inline messages while the user is typing in a field
- disable the submit button until all the needed data is available and the terms and conditions checkbox is checked
For a working version of this form implementing the above functionality, check the following github repository.
Note that the example above only needs a single line of Javascript code, that is necessary to import the ng-messages module:
angular.module('DemoApp', ['ngMessages']);
Apart from that, the whole functionality is based on built-in Angular directives and ng-messages.
The Angular form directive
When Angular compiles the DOM inside ng-app, it applies to form tags a built-in form directive. In the case of the above form, this means that the initial HTML of the form will look something like this:
<form class="ng-pristine ng-invalid
ng-invalid-required" name="frm">
Notice the strange looking ng-pristine and the ng-invalid classes that Angular automatically adds depending on the form state.
How do these built-in state classes work?
These classes are applied to both the form and the individual input fields, and can be used to help style the form. The following states are provided by Angular:
- ng-pristine: this means the form or input is in it’s initial state: no input fields where touched or edited
- ng-touched: the control or form was clicked by the user, but not necessarily edited
- ng-dirty: the input control was edited by the user
- ng-invalid: the form control was edited but it contains an invalid value
- ng-valid: the input control was edited by the user and contains a valid value
For example the ng-invalid state can be used to paint a red border around fields in error.
Angular built-in validation directives
The validations of each field can be declared directly in HTML. For example the password field has the following validations:
- field is mandatory
- minimum length of 6 characters
- maximum length of 10 characters
These validations are declared using the required, ng-minlength and
ng-maxlength directives:
<input name="password" ng-model="user.password" type="password" placeholder="Password" required ng-minlength="6" ng-maxlength="10">
See here the full list of built-in directives that can be applied to a form input. It’s also possible to create our own validation directives.
Enhanced form validation with ng-messages
While the user is entering data, it’s helpful to show a message informing him of the next step in the validation process, for example:
- first show that a field is required
- when the user starts typing, show a message indicating the minimum length
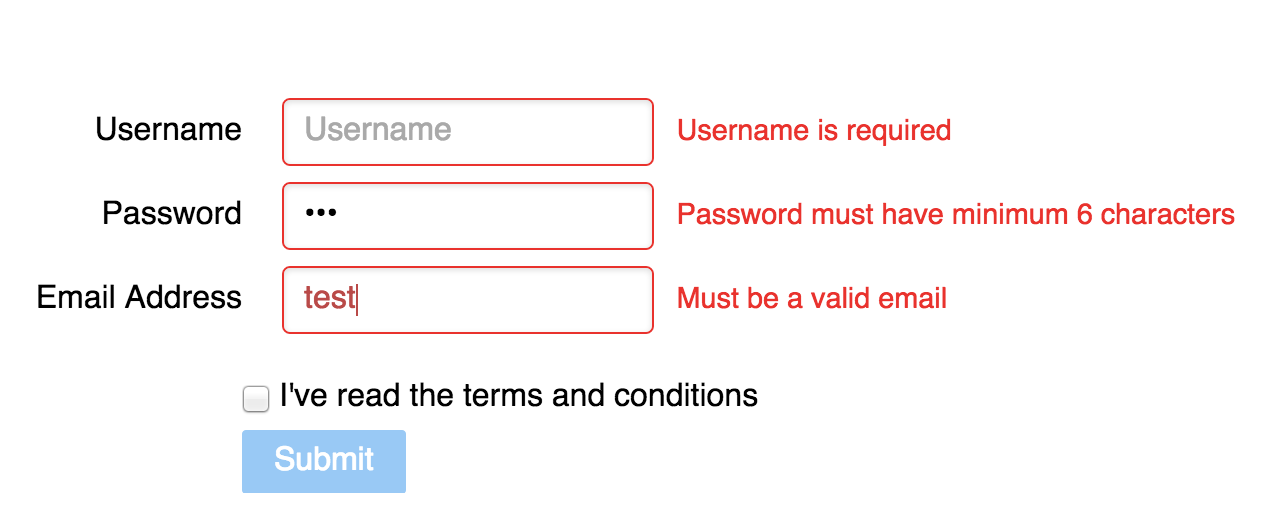
This is how the form should look with several of it’s components dirty and invalid:
This functionality can be implemented using the ng-messages directive:
<div class="pure-control-group">
        <label>Password</label>
        <input name="password" ng-model="user.password"
            type="password" placeholder="Password"
            required ng-minlength="6" ng-maxlength="10">
        <div class="field-message"
        ng-messages="frm.password.$error"
        ng-if='frm.password.$dirty' ng-cloak>
            <div ng-message="required">Password is required</div>
            <div ng-message="minlength">
                Password must have minimum 6 characters
            </div>
            <div ng-message="maxlength">
                Password must have maximum 10 characters
            </div>
        </div>
    </div>
Controlling the state of the submit button
The submit button can be made enabled/disabled according to the form validity and the condition checkbox using the ng-disabled directive:
<button type="submit" class="pure-button pure-button-primary"
ng-disabled="frm.$invalid || !conditions">Submit</button>
Conclusions
With the use of the Angular built-in directives and some additional modules, it’s possible to add a lot of commonly needed form validation features to an application, using a very small amount of code (seeexample).
Used together with ng-messages and ng-model, the form validation built-in functionality makes building complex forms with Angular a much more approachable task.
References
A thorough walk-through of Angular form validation can be found on this screencast (pre-ngMessages).