As mentioned in the post Install Eclipse Kepler 64 bit on Windows 7 64 bit, Podcastpedia.org uses Apache Tomcat 7 as application server. This post presents how the Tomcat JDBC Connection Pool is configured in development and production for Podcastpedia.org. The used database is MySql.
How to insert and highlight code in Jekyll blog post on Codepedia.org
This demo post displays the various ways of inserting and highlighting code in Markdown, when posting on Codepedia.org, because you know code showing is the main point of Codepedia.org
Syntax highlighting is a feature that displays source code, in different colors and fonts according to the category of terms. This feature facilitates writing in a structured language such as a programming language or a markup language as both structures and syntax errors are visually distinct. Highlighting does not affect the meaning of the text itself; it is intended only for human readers.1
To embed code and highlight the syntax you have several possibilities:
- use highlight.js2, my preferred way, by simple placing the code inside
<pre><code>; it tries to detect the language automatically. If automatic detection doesn’t work for you, you can specify the language in the class attribute:<pre><code class="html">...</code></pre> - Jekyll has built in support for syntax highlighting of over 60 languages thanks to Rouge3, which is a pure-ruby syntax highlighter. It can highlight 100 different languages, and output HTML or ANSI 256-color text. Its HTML output is compatible with stylesheets designed for pygments.
- use code blocks, which are part of the Markdown spec, but syntax highlighting isn’t. However, many renderers – like Github’s and Markdown Here – support syntax highlighting. Which languages are supported and how those language names should be written will vary from renderer to renderer.
How the blog post is structured?
Bellow I will list some code samples in various languages hightlighted with the different possibilities.
CSS
Highlight.js
Input
<pre><code class="css">#container {
    float: left;
    margin: 0 -240px 0 0;
    width: 100%;
}
</code></pre>
Result
#container {
    float: left;
    margin: 0 -240px 0 0;
    width: 100%;
}
Jekyll liquid templates
Input
{% highlight css %}
#container {
    float: left;
    margin: 0 -240px 0 0;
    width: 100%;
}
{% endhighlight %}
Result
#container {
    float: left;
    margin: 0 -240px 0 0;
    width: 100%;
}
There is a second argument to highlight called linenos that is optional.
Including the linenos argument will force the highlighted code to include line
numbers. For instance, the following code block would include line numbers next
to each line:
#container {
    float: left;
    margin: 0 -240px 0 0;
    width: 100%;
}
Markdown code block
Input
```css
#container {
    float: left;
    margin: 0 -240px 0 0;
    width: 100%;
}
```
Result
#container {
    float: left;
    margin: 0 -240px 0 0;
    width: 100%;
}
HTML
Highlight.js
Input
<pre><code class="html"><form action="action_page.php">
First name:<br>
<input type="text" name="firstname" value="Mickey"><br>
Last name:<br>
<input type="text" name="lastname" value="Mouse"><br><br>
<input type="submit" value="Submit">
</form></code></pre>Result
<form action="action_page.php">
  First name:<br>
  <input type="text" name="firstname" value="Mickey"><br>
  Last name:<br>
  <input type="text" name="lastname" value="Mouse"><br><br>
  <input type="submit" value="Submit">
</form>
As you can notice, one drawback of using highlight.js is that you need to escape the code snippets (especially html and xml), so that it doesn’t get interpreted by the browsers, but on the other hand the posts “feel” more like standard html directly in markdown; if you are using IntelliJ, like I am, you can use the String Manipulation Plugin4, or FreeFormater5 is a great online tool also for code escaping
Jekyll liquid templates
Input
{% highlight html %}
<form action="action_page.php">
  First name:<br>
  <input type="text" name="firstname" value="Mickey"><br>
  Last name:<br>
  <input type="text" name="lastname" value="Mouse"><br><br>
  <input type="submit" value="Submit">
</form>
{% endhighlight %}
Result
<form action="action_page.php">
  First name:<br>
  <input type="text" name="firstname" value="Mickey"><br>
  Last name:<br>
  <input type="text" name="lastname" value="Mouse"><br><br>
  <input type="submit" value="Submit">
</form>
Java
Highlight.js
Input
<pre><code class="java">/* HelloWorld.java
 */

public class HelloWorld
{
	public static void main(String[] args) {
		System.out.println("Hello World!");
	}
}
</code></pre>
Result
/* HelloWorld.java
 */

public class HelloWorld
{
	public static void main(String[] args) {
		System.out.println("Hello World!");
	}
}
Jekyll liquid templates
Input
{% highlight java %}
public class HelloWorld
{
	public static void main(String[] args) {
		System.out.println("Hello World!");
	}
}
{% endhighlight %}
Result
public class HelloWorld
{
	public static void main(String[] args) {
		System.out.println("Hello World!");
	}
}
Markdown
public class HelloWorld
{
	public static void main(String[] args) {
		System.out.println("Hello World!");
	}
}
Javascript
Highlight.js
Input
<pre><code class="javascript"> var hoisting = "global variable";
    (function(){
        confirm("\"" + hoisting + "\"" + " click OK" );
        var hoisting = "local variable";
        alert(hoisting);
    })(); //self-executing function
</code></pre>
Result
 var hoisting = "global variable";
    (function(){
        confirm("\"" + hoisting + "\"" + " click OK" );
        var hoisting = "local variable";
        alert(hoisting);
    })(); //self-executing function
Jekyll liquid templates
Input
{% highlight javascript %}
 var hoisting = "global variable";
    (function(){
        confirm("\"" + hoisting + "\"" + " click OK" );
        var hoisting = "local variable";
        alert(hoisting);
    })(); //self-executing function
{% endhighlight %}
Result
 var hoisting = "global variable";
    (function(){
        confirm("\"" + hoisting + "\"" + " click OK" );
        var hoisting = "local variable";
        alert(hoisting);
    })(); //self-executing function
Markdown
Input
```javascript
 var hoisting = "global variable";
    (function(){
        confirm("\"" + hoisting + "\"" + " click OK" );
        var hoisting = "local variable";
        alert(hoisting);
    })(); //self-executing function
```
Result
 var hoisting = "global variable";
    (function(){
        confirm("\"" + hoisting + "\"" + " click OK" );
        var hoisting = "local variable";
        alert(hoisting);
    })(); //self-executing function
Ruby
Highlight.js
Input
<pre><code class="ruby">module Jekyll
class TagIndex < Page
def initialize(site, base, dir, tag)
@site = site
@base = base
@dir = dir
@name = 'index.html'
self.process(@name)
self.read_yaml(File.join(base, '_layouts'), 'tag_index.html')
self.data['tag'] = tag
tag_title_prefix = site.config['tag_title_prefix'] || 'Tagged: '
tag_title_suffix = site.config['tag_title_suffix'] || '–'
self.data['title'] = "#{tag_title_prefix}#{tag}"
self.data['description'] = "An archive of posts tagged #{tag}."
end
end
end
</code></pre>Result
module Jekyll
  class TagIndex < Page
    def initialize(site, base, dir, tag)
      @site = site
      @base = base
      @dir = dir
      @name = 'index.html'
      self.process(@name)
      self.read_yaml(File.join(base, '_layouts'), 'tag_index.html')
      self.data['tag'] = tag
      tag_title_prefix = site.config['tag_title_prefix'] || 'Tagged: '
      tag_title_suffix = site.config['tag_title_suffix'] || '–'
      self.data['title'] = "#{tag_title_prefix}#{tag}"
      self.data['description'] = "An archive of posts tagged #{tag}."
    end
  end
end
Jekyll liquid templates
Input
{% highlight ruby %}
module Jekyll
class TagIndex < Page
def initialize(site, base, dir, tag)
@site = site
@base = base
@dir = dir
@name = 'index.html'
self.process(@name)
self.read_yaml(File.join(base, '_layouts'), 'tag_index.html')
self.data['tag'] = tag
tag_title_prefix = site.config['tag_title_prefix'] || 'Tagged: '
tag_title_suffix = site.config['tag_title_suffix'] || '–'
self.data['title'] = "#{tag_title_prefix}#{tag}"
self.data['description'] = "An archive of posts tagged #{tag}."
end
end
end
{% endhighlight %}Result
module Jekyll
class TagIndex < Page
def initialize(site, base, dir, tag)
@site = site
@base = base
@dir = dir
@name = 'index.html'
self.process(@name)
self.read_yaml(File.join(base, '_layouts'), 'tag_index.html')
self.data['tag'] = tag
tag_title_prefix = site.config['tag_title_prefix'] || 'Tagged: '
tag_title_suffix = site.config['tag_title_suffix'] || '–'
self.data['title'] = "#{tag_title_prefix}#{tag}"
self.data['description'] = "An archive of posts tagged #{tag}."
end
end
endMarkdown
Input
```ruby
module Jekyll
class TagIndex < Page
def initialize(site, base, dir, tag)
@site = site
@base = base
@dir = dir
@name = 'index.html'
self.process(@name)
self.read_yaml(File.join(base, '_layouts'), 'tag_index.html')
self.data['tag'] = tag
tag_title_prefix = site.config['tag_title_prefix'] || 'Tagged: '
tag_title_suffix = site.config['tag_title_suffix'] || '–'
self.data['title'] = "#{tag_title_prefix}#{tag}"
self.data['description'] = "An archive of posts tagged #{tag}."
end
end
end
```Result
module Jekyll
class TagIndex < Page
def initialize(site, base, dir, tag)
@site = site
@base = base
@dir = dir
@name = 'index.html'
self.process(@name)
self.read_yaml(File.join(base, '_layouts'), 'tag_index.html')
self.data['tag'] = tag
tag_title_prefix = site.config['tag_title_prefix'] || 'Tagged: '
tag_title_suffix = site.config['tag_title_suffix'] || '–'
self.data['title'] = "#{tag_title_prefix}#{tag}"
self.data['description'] = "An archive of posts tagged #{tag}."
end
end
end
Jekyll
When you want to include Jekyll code that won’t get interpret use the liquid templates
<nav class="pagination" role="navigation">
    {% if page.previous %}
        <a href="{{ site.url }}{{ page.previous.url }}" class="btn" title="{{ page.previous.title }}">Previous article</a>
    {% endif %}
    {% if page.next %}
        <a href="{{ site.url }}{{ page.next.url }}" class="btn" title="{{ page.next.title }}">Next article</a>
    {% endif %}
</nav><!-- /.pagination -->
Gist
Use the gist tag to easily embed a GitHub Gist onto your site. This works
with public or secret gists:
Input
{% gist amacoder/ed963f13f536cc1935f6c238db28da24 %}Result
You may optionally specify a filename after the gist_id, if you want to embed only one file:
Input
{% gist amacoder/ed963f13f536cc1935f6c238db28da24 Object.Prototype.js %}Result
Spring 3 MVC: Internationalization & localization of Podcastpedia.org
Podcastpedia.org can be accessed today in four languages – English, German, French and Romanian, with Spanish planned for the near future. In computing this is called internationalization (i18n). The post presents how this is configured under the hood with the help of Spring 3 MVC.
Application Context Configuration
Message Resource Files
Normally in the Java world, the locale-specific data is stored in message resource files. In Spring you configure it by adding the following bean org.springframework.context.support.ReloadableResourceBundleMessageSource to the application context:
<!-- Application Message Bundle -->
<bean id="messageSource"
  class="org.springframework.context.support.ReloadableResourceBundleMessageSource">
  <property name="basename" value="classpath:messages/messages" />
  <property name="defaultEncoding" value="UTF-8"/>
</bean>Story of Podcastpedia.org
The beginnings
It all began back 2002, my first year at the university in Romania, when I wanted to improve my German skills. At that time my grammar was pretty good, my writing skills were satisfying, but I still had difficulties expressing myself and understanding what the Germans are talking about on TV. Being a self-taught kind of person, I began looking for ways to improve that. On my research I stumbled upon Deutsche Welle’s website, which had lots of useful resources for learning German. I first listened to Langsam Gesprochene Nachrichten (Slowly Spoken News), which turned out to be very accesible and easy to understand. Then followed „Deutsch – warum nicht?“ (German- why not?) and „Marktplatz“ (marketplace). Back then you could download audio files with transcripts from the website – I still have like half of tree worth of paper of that lying in my basement, sorry…
How To: Enable compression and leverage browser caching with Apache Server
Looking for ways to improve Podcastpedia.org‘ mobile user-friendliness, I have discovered Google’s PageSpeed Insights . After analyzing the home page, a podcast’s page (The Naked Scientists Podcast – Stripping Down Science), an episode page and scoring an average of 70 out of 100 (even worse on mobile) two points needed urgent fixing:
1. Enabling compression
Compressing resources with gzip or deflate will reduce the number of bytes sent over the network at the expense of slightly increased CPU utilization. Smaller files also mean less bandwidth used and faster transfer time. At Google’s recommendation I have enabled file compression on the Apache web server, for which you have to use the mod_deflate module.
1.1 Enable mod_deflate on GoDaddy
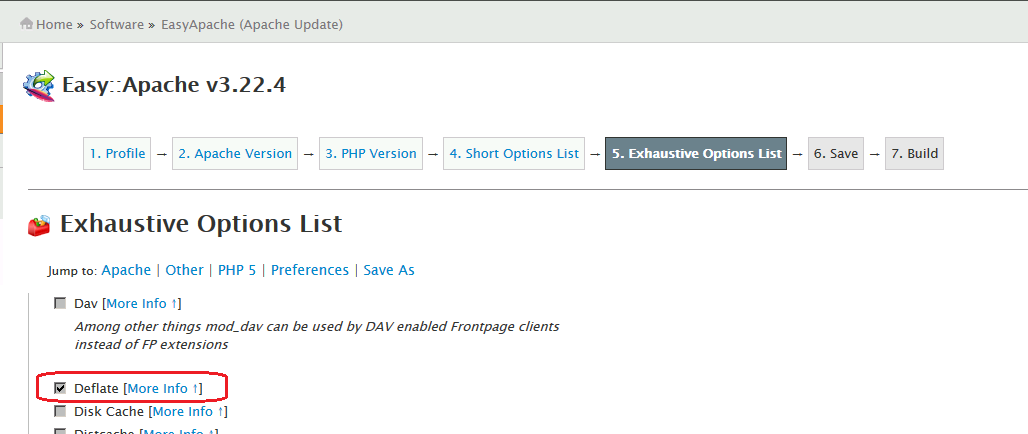
To enable mod_deflate on a GoDaddy Virtual Private Server account, you have to use Easy Apache and the same procedure as in Troubleshooting WordPress installation on GoDaddy VPS. You need to check the Deflate option at step number 5. Exhaustive Options List and recompile the Apache Server.
To verify the module mod_deflate is active run the following command on CentOS
httpd -M | grep deflate_module